
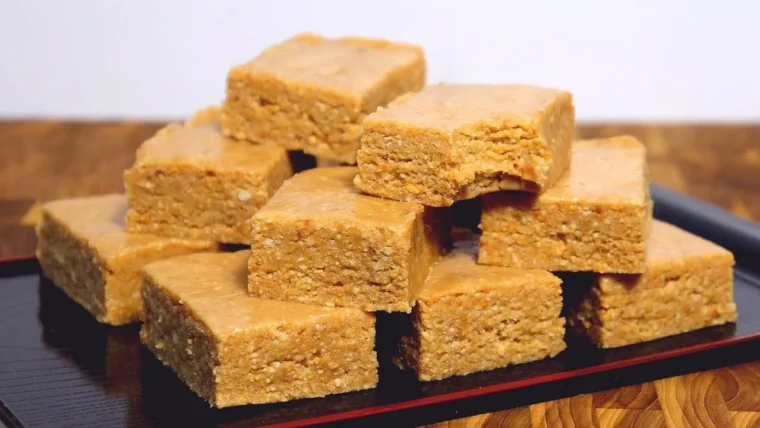
Paçoca (Brazilian Peanut Candy): Traditional Step-by-Step Recipe
Introduction
Paçoca is a traditional Brazilian candy, much loved at Festas Juninas and other celebrations throughout the year. Made with peanuts, sugar, and toasted cassava flour or corn flour, paçoca is known for its sandy texture and irresistible flavor. In this article, we explore its history and cultural importance, share a detailed and unique recipe, and give tips for making it at home. This comprehensive guide includes the recipe yield, prep time, and a detailed nutrition table.
History
The word paçoca comes from the Tupi-Guarani posok or posoká, meaning to crumble or grind. Paçoca has its roots in Indigenous cuisine, where it was originally prepared with dried beef, cassava flour, and salt. Over time, the sweet version, made with peanuts, sugar, and flour, became the most popular across many regions of Brazil, especially during Festas Juninas.
Ingredients
Main Ingredients
-
17.6 oz roasted skinless peanuts, good quality (500 g / about 3 1/2 cups)
-
1 cup granulated sugar
-
1/2 cup toasted cassava flour
-
1 pinch of salt
Optional Ingredients
-
1 tbsp butter, good quality
-
1/2 cup shredded coconut (optional)
Needed Equipment
-
Food processor or blender
-
Large bowl
-
Wooden spoon or spatula
-
Baking pan or mold for shaping the paçoca
Yield and Prep Time
-
Yield: About 30 pieces of paçoca
-
Prep Time: 30 minutes
Step-by-Step Instructions
Step 1: Preparing the Ingredients
-
Toast the Peanuts: If the peanuts are not already toasted, spread them on a baking sheet and bake in a preheated oven at 350°F (180°C) for 10-15 minutes, stirring occasionally so they do not burn. Let cool.
-
Grind the Peanuts: Place the peanuts in a food processor or blender and grind until grainy, but not as fine as flour. Set aside.
Step 2: Mixing the Ingredients
-
Mix the Dry Ingredients: In a large bowl, mix the ground peanuts, the sugar, the toasted cassava flour, and the salt. If using shredded coconut, add it now.
-
Add the Butter (Optional): For a moister paçoca, add the butter and mix well until all the ingredients are combined.
Step 3: Shaping
-
Shape the Paçoca: Press the mixture firmly into a baking pan or mold so it holds together. Use a wooden spoon or spatula to level the surface.
-
Cut the Paçoca: Once shaped, cut into squares or rectangles of the desired size. Let rest for a few minutes before serving.
Tips for a Perfect Paçoca
-
Ideal Texture: Grind the peanuts to a grainy texture, not too fine, to keep paçoca’s signature sandy crumb.
-
Optional Butter: Adding butter is optional, but it can give a moister, creamier texture.
-
Flour Varieties: Try swapping the cassava flour for corn flour for a different flavor.
Paçoca Variations
-
With Coconut: Add shredded coconut to the mixture for a tropical touch.
-
With Chocolate: Fold pieces of dark chocolate into the mixture for a more indulgent version.
-
With Nuts: Replace some of the peanuts with cashews or Brazil nuts for a sophisticated twist.
Serving Suggestions
-
Coffee: A good black coffee is the perfect pairing.
-
Milk: For a more traditional touch, serve paçoca with a glass of milk.
-
Ice Cream: Serve with a scoop of vanilla ice cream for a special dessert.
Nutrition Facts
| Nutrient | Amount per Serving (1 piece) |
|---|---|
| Calories | 120 kcal |
| Carbohydrates | 15 g |
| Protein | 4 g |
| Fat | 6 g |
| Fiber | 2 g |
| Sodium | 40 mg |
Conclusion
It is a candy that brings together simplicity and tradition, carrying childhood memories and Festas Juninas with it. With its easy recipe and affordable ingredients, it is an excellent option to make at home and share with friends and family. By following this detailed recipe, you can enjoy a delicious, authentic paçoca.
Share this recipe
Enjoyed it? Find more recipes like this on our site or join our Facebook group.


💬 Comentários (0)
Deixe sua teoria ou opinião sobre esta matéria.
Nenhum comentário por enquanto. Seja o primeiro a comentar!